Strawberry Crisp

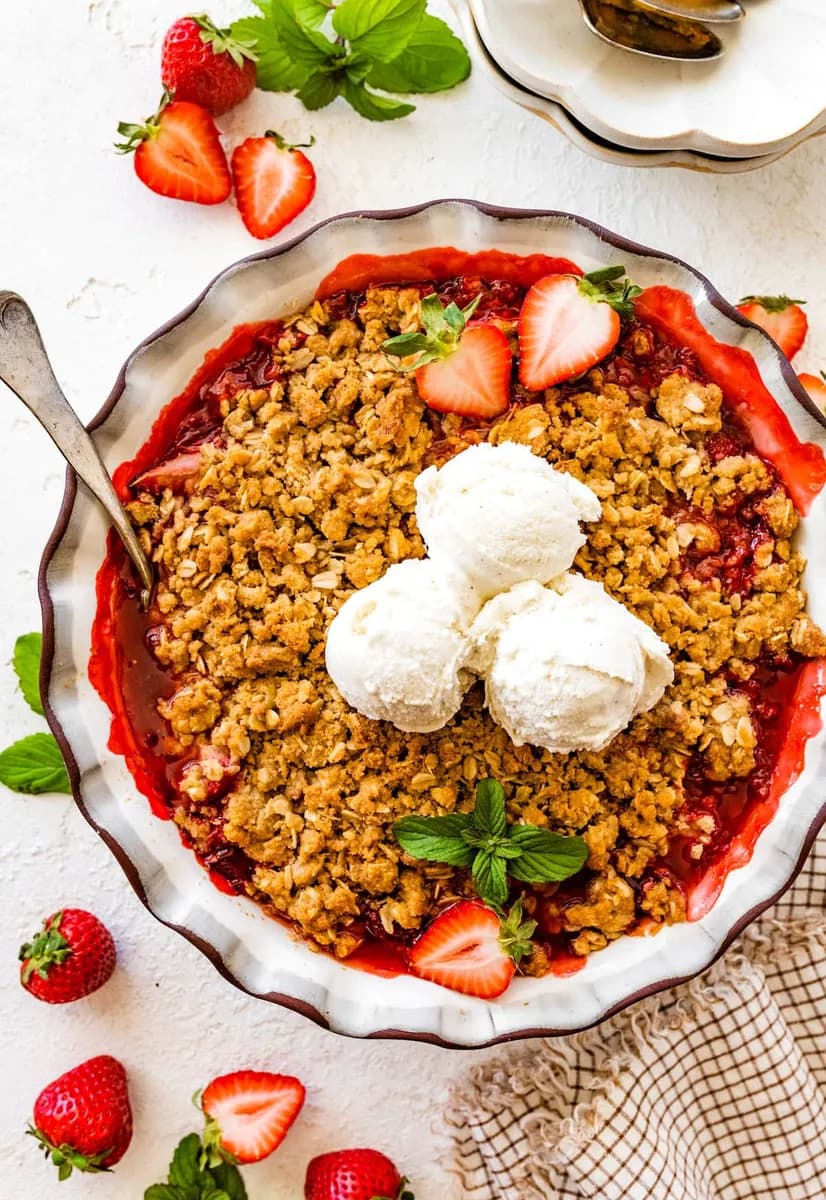
Sweet, juicy strawberries baked under a crisp oat topping—this easy strawberry crisp is the ultimate summer dessert. Ready in under an hour and perfect with ice cream!
Continue the meal with Double-Crusted Plum Crisp or Blueberry Coconut Crisp.
Why This Strawberry Crisp Is the Summer Dessert You Need
Think of this strawberry crisp as the easygoing cousin of strawberry pie. No finicky crust to roll out, just juicy, jammy berries under a buttery oat topping that bakes up golden and crunchy. The whole thing comes together in about 10 minutes of hands-on work. You can serve it at a backyard BBQ, share it with neighbors on the porch, or sneak a spoonful straight from the fridge the next morning. It’s the kind of dessert that makes you glad strawberry season is here.
Why You’ll Love This Strawberry Crisp
- Quick and easy: just mix, sprinkle, and bake, no pastry skills needed.
- Uses fresh strawberries at their peak, so the filling tastes like summer in a dish.
- The oat topping stays crunchy on top while the berries bubble into a thick, jammy sauce underneath.
Key Ingredients for Strawberry Crisp
- Fresh strawberries: Use ripe, fragrant berries. If they’re underripe, the filling won’t be as jammy. Frozen strawberries work too, but you’ll need to adjust the cornstarch and bake time (see FAQ).
- Cornstarch: Thickens the berry juices so the filling is glossy and not watery. Don’t skip it or substitute flour, cornstarch gives a cleaner, silkier texture.
- Old-fashioned rolled oats: They hold their shape better than quick oats, giving the topping a hearty, crunchy texture. Quick oats will work but will be less distinct.
Kitchen Tools for Strawberry Crisp
- 10-inch oven-safe skillet, 2-quart baking dish, or 9×9-inch square pan
- Pastry blender or fork for cutting butter into the topping
- Large bowl for mixing the berry filling
- Wire rack for cooling after baking
Tips for Making the Best Strawberry Crisp
Cut the strawberries into even halves or quarters so they cook at the same rate and don’t turn to mush. Toss the cornstarch thoroughly with the fruit; don’t just sprinkle it on top, or you’ll get watery filling. Use cold butter straight from the fridge, soft butter makes the topping dense instead of crumbly. And don’t skip the lemon juice: it brightens the berries and balances the sweetness. Feel free to add a pinch of nutmeg or cardamom, or mix in a handful of raspberries or blueberries for a twist.
Expert Tips for a Perfect Strawberry Crisp
For the crispest topping, use a pastry blender or fork to cut the butter into the dry ingredients until the mixture resembles coarse meal, then use your fingers to squeeze it into larger clumps. Those clumps stay distinct during baking and give you those irresistible craggy bits. Let the crisp rest for at least 5 minutes after it comes out of the oven, the filling needs that time to set up so you get clean servings, not a soupy mess. If you’re using a glass baking dish, check that your oven temperature is accurate; glass retains heat differently and can over-brown the topping.
Strawberry Crisp Variations to Try
Swap half the strawberries for an equal weight of sliced rhubarb for a classic spring pairing, just increase the sugar to 1/2 cup since rhubarb is tart. For a gluten-free version, replace the all-purpose flour with a 1:1 gluten-free baking blend; the oats are gluten-free by nature, but double-check the package. You can also add a handful of blueberries or raspberries to the filling for a mixed berry crisp. If you like a little warmth, stir 1/4 teaspoon of freshly grated nutmeg into the topping along with the cinnamon.
What to Serve with Strawberry Crisp
A scoop of vanilla ice cream is the classic partner, the cold, creamy texture plays off the warm, jammy berries and crunchy topping. For a tangier contrast, dollop on some lightly sweetened whipped cream or a spoonful of crème fraîche. If you want to go all out, drizzle a little balsamic reduction over the top right before serving; the acidity echoes the lemon in the filling and deepens the strawberry flavor.
How to Store Leftover Strawberry Crisp
Let the crisp cool completely, then cover the dish with plastic wrap or transfer leftovers to an airtight container. Refrigerate for up to 3 days. The topping will soften as it sits, but it’s still delicious. If you want to restore some crunch, reheat individual portions in the microwave or pop the whole dish back in a 350°F oven for 10-15 minutes.
Can You Freeze Strawberry Crisp?
Yes, but the texture will change. Assemble the crisp in a freezer-safe baking dish but don’t bake it. Wrap tightly with foil and freeze for up to 3 months. When ready to bake, add about 15 minutes to the bake time (no need to thaw). The frozen berries will release more liquid, so the filling may be slightly looser. Alternatively, freeze a fully baked and cooled crisp: wrap it well and freeze for up to 3 months. Thaw in the fridge overnight and reheat in a 350°F oven until warmed through.
Best Ways to Reheat Strawberry Crisp
For a single serving, the microwave is quick and easy, warm it in 30-second bursts until hot. The topping will lose its crunch this way, so if you want to preserve some crispness, use the oven. Spread the crisp in an oven-safe dish and reheat at 350°F for 10-15 minutes, or until the filling is bubbling and the topping sizzles. Let it sit for a couple of minutes before serving.
Strawberry Crisp FAQs
Can I use frozen strawberries?
Fresh strawberries are best for flavor and texture, but frozen berries work if you don’t thaw them first. Toss them with the cornstarch and other filling ingredients straight from the bag. Increase the cornstarch to 3 tablespoons to offset the extra moisture, and expect the bake time to be 5 to 10 minutes longer.
Can I make this strawberry crisp gluten-free?
Yes, swap the all-purpose flour for a 1:1 gluten-free baking blend. The oats are naturally gluten-free, but check the label to confirm they are certified gluten-free if you need to avoid cross-contamination. The topping will still be crunchy and delicious.
Recipe
Strawberry Crisp

Sweet, juicy strawberries baked under a crisp oat topping—this easy strawberry crisp is the ultimate summer dessert. Ready in under an hour and perfect with ice cream!
Ingredients
- 2 lbs fresh strawberries, hulled and halved or quartered
- 0.33 cup granulated white sugar
- 1 tbsp fresh lemon juice
- 1.5 tsp pure vanilla extract
- 2 tbsp cornstarch
- 0.75 cup all-purpose flour
- 0.75 cup packed light brown sugar
- 0.75 cup old-fashioned rolled oats
- 0.5 tsp ground cinnamon
- 0.25 tsp salt
- 0.5 cup cold unsalted butter, cubed
Instructions
- 1
Preheat the oven to 350°F. Grease a 10-inch oven safe skillet, 2-quart baking dish, or 9×9-inch square baking dish. Set aside.
- 2
In a large bowl, add the strawberries, sugar, lemon juice, vanilla extract, and cornstarch. Stir until well combined.
- 3
Pour the berry mixture into the prepared baking dish.
- 4
In a medium bowl, combine the flour, brown sugar, oats, cinnamon, and salt. Use a pastry blender or fork to cut the butter into the oat mixture until it becomes crumbly. Then, using your clean fingers, press the mixture into larger clumps until all the flour mixture is fully incorporated into the butter.
- 5
Sprinkle the oat mixture evenly over the strawberries. Bake for 40 to 45 minutes, or until the topping is golden brown and the strawberry juices are bubbling around the edges.
- 6
Remove the crisp from the oven and set it on a wire rack to cool for about 5 minutes before serving. Serve warm with vanilla ice cream, if desired.
Nutrition (per serving)
Calorie breakdown
How this was calculated — 11 of 11 ingredients matched
Nutrition information is automatically calculated from USDA FoodData Central, so should only be used as an approximation. Actual values may vary depending on the ingredients, brands, and preparation methods used.
Open in analyzerKeyword: dessert, Oven Baked, summer, vegetarian
This post may contain affiliate links. Read our disclosure policy.
Share this recipe
You Might Also Like
View All →


About the Author
NutriforksNutriForks is a home-cooking site built around two simple ideas: recipes should actually work, and you should know what’s in them. Every recipe pairs clear, tested instructions with a full nutrition breakdown, so healthy, everyday cooking is genuinely easy.