Chocolate Mint Thumbprint Cookies

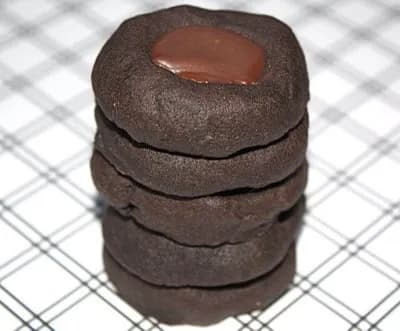
These chocolate mint thumbprint cookies taste just like Thin Mints! Easy cocoa shortbread with a mint chocolate filling. Perfect for curbing cravings.
Continue the meal with Pumpkin Chocolate Chip Bundt Cake or Oatmeal Cookies with White Chocolate and Dried Cranberries.
How I Discovered These Chocolate Mint Thumbprint Cookies
I was scrolling through Twitter one afternoon when I spotted a tweet from Dawn about some chocolate mint thumbprints she’d just baked. I clicked over to her blog and found Recipe Girl’s recipe. The cookies looked incredible, rich chocolate shortbread with a glossy mint center. I added them to my ever-growing baking list, but they kept getting bumped. Then Girl Scout cookie season hit and Thin Mints were everywhere. To curb my craving, I moved these to the top. I used Andes mint chips for the filling since I had them on hand. One bite and my Thin Mint craving was gone. Thanks, Twitter!
Why You’ll Love These Chocolate Mint Thumbprint Cookies
- They taste just like Thin Mints, with a crisp cocoa shortbread base and a rich mint chocolate filling.
- The dough comes together in minutes and doesn’t require any tricky techniques, just chill, roll, and press.
- You can customize the filling with Andes mints, chocolate chips, or even white chocolate for a different twist.
Key Ingredients for Chocolate Mint Thumbprint Cookies
- Dutch-process cocoa gives the cookies a deep, dark color and a smooth, mellow chocolate flavor. Natural cocoa works too, but the color will be lighter and the taste slightly more acidic.
- Powdered sugar (not granulated) keeps the shortbread tender and helps the cookies hold their shape without spreading.
- Pure peppermint extract is essential for a clean mint flavor. Avoid imitation extract, which can taste artificial. You can substitute a few drops of peppermint oil, but use a light hand.
Kitchen Tools for Chocolate Mint Thumbprint Cookies
- Hand mixer or stand mixer with paddle attachment
- Cookie sheets (heavy-duty preferred for even baking)
- Parchment paper or nonstick baking liners
- Small pastry bag with plain tip, or a small zip-top bag for piping the filling
- Thick-handled wooden spoon (or your thumb) for making indentations
Tips for Making the Best Chocolate Mint Thumbprint Cookies
The dough needs a thorough chill, at least 40 to 60 minutes, so it’s firm enough to roll into balls without sticking. If it’s still too soft after an hour, pop it back in the fridge for another 15 minutes.
When pressing the indentations, go almost all the way to the baking sheet. A deep well means plenty of room for the mint filling. After baking, the cookies puff up slightly, so gently redefine the wells with the end of a wooden spoon while they’re still warm.
Let the filling cool until it’s a bit warmer than room temperature before piping. If it’s too runny, it will pool over the cookie; too thick and it won’t pipe smoothly.
How to Make Chocolate Mint Thumbprint Cookies Ahead of Time
The dough can be made up to 2 days in advance and kept tightly wrapped in the refrigerator. When you’re ready to bake, let it sit at room temperature for 10 minutes to soften slightly for easier rolling. You can also scoop the dough into balls and freeze them on a baking sheet, then transfer to a freezer bag. Bake from frozen, adding about 2 minutes to the baking time. The filling can be made ahead too, but it’s best to pipe it just before serving to keep the cookies crisp.
Chocolate Mint Thumbprint Cookies Variations to Try
If you have Andes mint chips on hand, use them in place of the chocolate and butter mixture. Just melt them with a teaspoon of vegetable oil to thin the filling. For a chocolate-orange version, swap the peppermint extract for orange extract and top each cookie with a tiny piece of candied orange peel. Try a white chocolate filling by melting white chocolate chips with a tablespoon of butter and a drop of mint extract. And for a festive twist, sprinkle crushed candy canes over the filling before it sets.
What to Serve with Chocolate Mint Thumbprint Cookies
These cookies are wonderful on their own, but they really shine alongside a cold glass of milk or a warm mug of hot cocoa. For an extra-indulgent dessert, serve them with a scoop of vanilla bean ice cream and a drizzle of chocolate sauce. They also make a great addition to a holiday cookie platter next to gingerbread and sugar cookies.
How to Store Leftover Chocolate Mint Thumbprint Cookies
Store the cookies in an airtight container at room temperature for up to a week. If you need to stack them, place a sheet of wax paper between layers to keep the filling from smudging. Avoid refrigerating them, as the filling can become grainy.
Can You Freeze Chocolate Mint Thumbprint Cookies?
Yes, you can freeze both the unbaked dough and the baked cookies. For the dough, roll it into balls, place them on a lined baking sheet, and freeze until solid. Transfer to a freezer bag and keep for up to 3 months. Bake from frozen, adding a minute or two to the baking time. For baked cookies, freeze them unfilled in a single layer, then pack in a freezer container. Fill them after thawing to keep the filling fresh.
Chocolate Mint Thumbprint Cookies FAQ
Why did my dough spread during baking?
The dough needs to be well-chilled. If it’s too warm, the butter melts too quickly and the cookies will flatten. Chill for at least 40 minutes, and if your kitchen is warm, pop the formed balls back in the fridge for 10 minutes before baking.
Can I use natural cocoa powder instead of Dutch-process?
Yes, but the cookies will be lighter in color and slightly more acidic in flavor. Dutch-process cocoa gives a smoother, deeper chocolate taste that pairs nicely with the mint.
How deep should the indentations be?
Press almost all the way to the baking sheet. A deep well ensures enough room for the filling and prevents it from spilling over the edges.
Can I use mint extract in the cookie dough too?
You can, but it’s not necessary. The dough has a mild chocolate flavor that lets the mint filling stand out. If you want a double mint effect, add 1/4 teaspoon peppermint extract along with the vanilla.
Recipe
Chocolate Mint Thumbprint Cookies

Chocolate and mint thumbprint cookies with a mint chocolate filling, perfect for curbing a Thin Mint craving.
Ingredients
cookie
- 1.156 cup unbleached all-purpose flour
- 0.25 cup Dutch-processed cocoa
- 0.75 cup unsalted butter, at room temperature
- 0.5 cup powdered sugar, sifted
- 1.5 tsp pure vanilla extract
- 0.25 tsp salt
filling
- 0.75 cup chopped chocolate chips
- 3 tbsp unsalted butter, cut into 6 pieces
- 0.25 tsp pure peppermint extract
Instructions
- 1
Sift flour and cocoa together into a medium bowl. With a hand mixer or a stand mixer fitted with the paddle attachment, cream butter and sugar on medium speed until light and fluffy, about 2 minutes. Add the vanilla and salt; continue beating until blended and smooth, about 1 minute more. Add the flour-cocoa mixture and mix on low speed until a soft dough forms, about 1 minute.
- 2
Chill the dough in the refrigerator until firm enough to roll into balls, 40 to 60 minutes (or longer).
- 3
Position a rack in the center of the oven and heat the oven to 350°F. Line two cookie sheets with parchment or nonstick baking liners.
- 4
Using your palms, roll heaping teaspoonfuls of the dough into 1-inch balls. Arrange them 2 inches apart on the lined sheets. With a lightly floured thumb or index finger-tip, press straight down into the middle of each ball almost to the cookie sheet to make a deep well. (Or use the end of a thick-handled wooden spoon.)
- 5
Bake one sheet at a time until the tops of the cookies look dry, 8 to 9 minutes. Gently redefine the indentations with the end of a wooden spoon. Let the cookies cool on the sheet for 5 minutes and then let them cool completely on racks.
- 6
For the filling: Put the chocolate and butter in a heatproof bowl. Microwave for 30 second bursts (stirring after each heating) until melted and smooth. Stir in mint extract. Let the filling cool, stirring occasionally, until slightly thickened and a bit warmer than room temperature, 30 to 40 minutes. Spoon the filling into a small pastry bag with a small plain tip. (Or use a small plastic bag and cut a tiny bit off a bottom corner of the bag.) Pipe the filling into the center of each cookie. Cool completely before serving or storing.
Nutrition (per serving)
Calorie breakdown
How this was calculated — 9 of 9 ingredients matched
Nutrition information is automatically calculated from USDA FoodData Central, so should only be used as an approximation. Actual values may vary depending on the ingredients, brands, and preparation methods used.
Open in analyzerKeyword: Chocolate, cookies, dessert, mint, nutFree, Oven Baked, vegetarian
This post may contain affiliate links. Read our disclosure policy.
Share this recipe
You Might Also Like
View All →





About the Author
NutriforksNutriForks is a home-cooking site built around two simple ideas: recipes should actually work, and you should know what’s in them. Every recipe pairs clear, tested instructions with a full nutrition breakdown, so healthy, everyday cooking is genuinely easy.