Slow Cooker Apple Butter

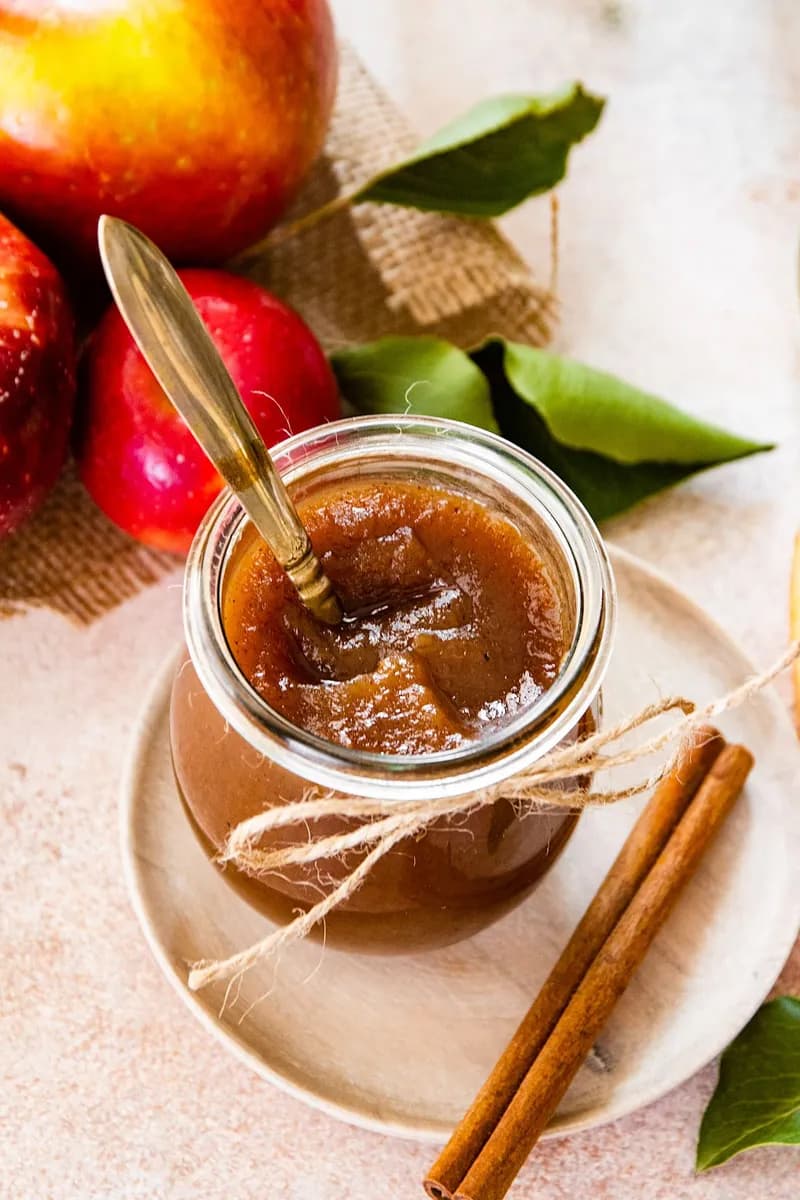
Make this easy slow cooker apple butter with just a few simple ingredients. It’s the perfect way to use fall apples and your house will smell amazing!
Sharing a glutenFree theme with this one: Balsamic Butter Sauce and Pumpkin Cinnamon Streusel Pancakes.
Why This Slow Cooker Apple Butter Tastes Like Fall
This slow cooker apple butter is the kind of recipe that fills your kitchen with the warm scent of cinnamon and apples for hours. The long, gentle cooking caramelizes the natural sugars in the fruit, giving it a deep, almost jammy sweetness without any added pectin. I remember the first time I made it, I kept lifting the lid just to breathe in the smell, and by the time it was done, the whole house smelled like a bakery in October.
3 Reasons to Make This Homemade Apple Butter
- Hands-off cooking. The slow cooker does all the work. You just stir it a few times, and hours later you have a rich, spreadable butter.
- Incredible aroma. While it cooks, your house will smell better than any fall candle. It’s a natural air freshener.
- Uses up a pile of apples. Got a big bag from the orchard? This easy apple butter recipe turns 6 pounds of apples into something you’ll want to put on everything.
Key Ingredients for Homemade Apple Butter
- Apples, Use a mix of sweet and tart varieties like Honeycrisp, Fuji, or Granny Smith. You need 6 pounds total. Peel, core, and slice them. An apple peeler that cores at the same time speeds this up a lot.
- Dark brown sugar, Pack it firmly when measuring. The molasses in dark brown sugar adds a deeper, richer flavor than light brown sugar. You can use light brown if that’s what you have.
- Spices, Fresh cinnamon, nutmeg, and cloves make a big difference. If your spices are more than a year old, consider replacing them for the best fall flavor.
Kitchen Tools for Slow Cooker Apple Butter
- Large slow cooker, At least 6-quart capacity to hold 6 pounds of apples.
- Immersion blender, For pureeing right in the pot. A regular blender works too, but you’ll need to work in batches and let the mixture cool slightly.
- Apple peeler (optional), A crank-style peeler that cores and slices in one pass saves a lot of time.
- Jars or containers, For storing the finished apple butter. Glass jars with tight lids are ideal.
Tips for Making Slow Cooker Apple Butter
Start by tossing the sliced apples with the sugars and spices in a large bowl. Make sure every slice is coated, this helps the flavors meld from the beginning. Transfer everything to the slow cooker, cover, and cook on high for 5 hours or low for 10 hours. Stir occasionally, especially if you’re cooking on high, to keep the edges from drying out.
Once the apples are tender and dark brown, stir in the vanilla and puree with an immersion blender until smooth. Then cook uncovered (or with the lid cracked) on high for another 1.5 to 2 hours, stirring every 20 minutes or so. This final step is where the magic happens, the excess moisture evaporates and the apple butter gets that thick, spreadable consistency.
Tips for Making the Best Crockpot Apple Butter
Stir the apples occasionally during the first long cook, about once an hour if you’re around. This helps them cook evenly and prevents any sticking on the edges. Don’t skip the final thickening step after you puree it. That extra 1.5 to 2 hours on high is what concentrates the flavor and gives you a spreadable texture instead of a thin sauce.
When you use the immersion blender, be careful not to splatter. The mixture is hot. Blend in short bursts, moving the blender around until it’s completely smooth. If you don’t have an immersion blender, you can transfer the cooked apples to a regular blender in batches, but let it cool slightly first to avoid steam pressure.
How to Tell When Your Apple Butter Is Thick Enough
After the final cook, the apple butter should look dark brown and glossy. To test the thickness, drag a spoon across the surface. If the trail holds its shape for a few seconds before slowly filling in, it’s ready. Keep in mind that it will thicken more as it cools. If you prefer a very thick spread, cook it the full 2 hours on high. For a looser consistency, stop at 1.5 hours.
Apple Butter Variations to Try
You can swap the white and brown sugars for other sweeteners. Use 1 cup of maple syrup or honey instead of the granulated sugar, but keep the brown sugar for depth. For a spicier version, add 1/4 teaspoon of ground ginger or allspice along with the other spices. If you like a chunkier texture, puree only half the batch and stir the rest in by hand. For a deeper apple flavor, replace 1/2 cup of the sugar with apple cider, just reduce the cooking time slightly if the mixture seems too thin.
What to Do With Apple Butter: Serving Ideas
Spread it on toast, biscuits, bagels, or muffins for a quick breakfast. Stir a spoonful into oatmeal or overnight oats, or dollop it on top of baked oatmeal. It’s also great on pancakes, waffles, and French toast instead of syrup. For a savory twist, spread it on a grilled cheese sandwich or brush it over chicken or pork chops during the last few minutes of cooking. And don’t forget a cheese board, a small bowl of apple butter pairs beautifully with sharp cheddar and crackers.
How to Store Apple Butter
Let the apple butter cool completely in the jars or containers before sealing. Store it in the refrigerator for up to 1 month. Before using, check for any off smells or mold, if it looks or smells fine, it’s good to go. If you want to keep it longer, you can freeze it (see the freezing section above). I haven’t tried water-bath canning, so I can’t advise on that method.
How to Freeze Apple Butter for Later
Let the apple butter cool completely after cooking. Spoon it into freezer-safe jars or containers, leaving about an inch of headspace for expansion. Seal tightly and freeze for up to 3 months. To thaw, move a jar to the refrigerator overnight. The texture stays smooth and spreadable. You can also freeze it in ice cube trays for small portions, pop out the cubes and store them in a freezer bag.
Apple Butter FAQs
Is apple butter actually butter?
No, apple butter doesn’t contain any dairy. It’s concentrated fruit, cooked down until it’s thick and spreadable, similar to jam but smoother. The name comes from its buttery texture.
Can I use different types of apples?
Yes, you can use any combination of apples. Sweet varieties like Honeycrisp, Fuji, or Gala work well. Tart apples like Granny Smith add a nice balance. Avoid mealy apples like Red Delicious, which won’t break down as smoothly.
Do I have to peel the apples?
Yes, peeling is important. The peels don’t break down during cooking and would leave a gritty texture in the finished apple butter. An apple peeler makes the job much faster.
Can I reduce the sugar?
You can cut the sugar by up to half, but the apple butter will be less sweet and may not thicken as much. The sugar helps with preservation and texture. If you reduce it, you might need to cook the final stage a little longer to evaporate more liquid.
How long does it take to make?
Total time is about 7 hours on high or 12 hours on low, but most of that is hands-off. Prep takes 10 minutes, then the slow cooker does the work. The final thickening step requires occasional stirring.
Recipe
Slow Cooker Apple Butter

This easy homemade apple butter recipe is made in the crockpot with just a few simple ingredients. It is a great way to use up all of the fall apples and your house will smell amazing while it cooks!
Ingredients
- 6 lb apples, peeled, cored, and sliced
- 0.75 cup dark brown sugar, packed
- 0.75 cup granulated sugar
- 1 tbsp ground cinnamon
- 0.5 tsp ground nutmeg
- 0.25 tsp ground cloves
- 1 pinch salt
- 1 tbsp vanilla extract
Instructions
- 1
Place the apple slices in a large bowl. Add the brown sugar, granulated sugar, cinnamon, nutmeg, cloves, and salt. Stir until well combined.
- 2
Place the apple slices in a large slow cooker.
- 3
Cover and cook on high 5 hours, or low 10 hours, stirring occasionally, until the apples are tender and dark brown.
- 4
Remove the lid and stir in the vanilla extract. Puree with an immersion blender until smooth.
- 5
Cook on high for an additional 1.5 to 2 hours, stirring occasionally, so the mixture can thicken.
- 6
Spoon into jars or containers. Let cool and then cover and refrigerate for up to 1 month.
- 7
Spread on bread, biscuits, or muffins, stir into yogurt or oatmeal, or top your pancakes, waffles, and French toast with it! It also makes a great gift!
Nutrition (per serving)
Calorie breakdown
How this was calculated — 8 of 8 ingredients matched
Nutrition information is automatically calculated from USDA FoodData Central, so should only be used as an approximation. Actual values may vary depending on the ingredients, brands, and preparation methods used.
Open in analyzerKeyword: dairy-free, dairyFree, gluten-free, glutenFree, nut-free, nutFree, Simmered, vegan, vegetarian
This post may contain affiliate links. Read our disclosure policy.
Share this recipe
You Might Also Like
View All →


About the Author
NutriforksNutriForks is a home-cooking site built around two simple ideas: recipes should actually work, and you should know what’s in them. Every recipe pairs clear, tested instructions with a full nutrition breakdown, so healthy, everyday cooking is genuinely easy.