Peanut Butter Butterfinger Cookies

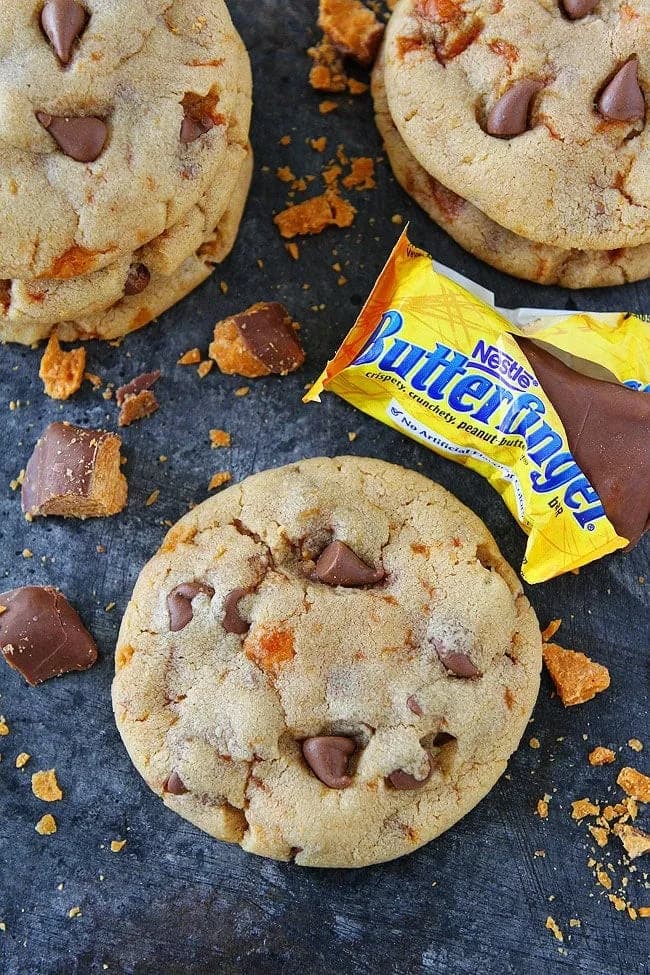
These Peanut Butter Butterfinger Cookies are soft, chewy, and packed with crunchy candy and chocolate. Use leftover Halloween candy for an easy treat! Get the recipe.
Here’s what to make next: Salted Pretzel Peanut Butter Cup Cookies, Flourless Chocolate Cookies, Cowboy Cookies, and Crispy Butterfinger Cookies.
What Makes These Peanut Butter Butterfinger Cookies So Good
Peanut Butter Butterfinger Cookies are my go-to when I have leftover Halloween candy that needs a second life. The nutty richness of creamy peanut butter pairs perfectly with crunchy bits of Butterfinger and melty milk chocolate chips. Each bite offers a soft, chewy center with little pockets of toffee crunch and chocolate.
Why You’ll Love This Butterfinger Cookie Recipe
- These cookies stay soft for days thanks to the high peanut butter content, so you can bake ahead.
- The combo of three textures, creamy, crunchy, and melty, makes every bite interesting.
- No chilling or special equipment required; just mix, scoop, and bake in 10 minutes.
Key Ingredients for Soft Peanut Butter Butterfinger Cookies
- Butterfinger candy bars: They provide the distinctive peanut-butter toffee crunch. Chop them into small pieces to distribute evenly. If stale, toast for 3 minutes at 350°F to revive the texture.
- Creamy peanut butter: Use a shelf-stable brand like Jif for consistent texture and sweetness. Natural peanut butter may alter the dough consistency. Do not use reduced-fat versions as they often contain more sugar and less fat, affecting spread.
- Milk chocolate chips: They melt into sweet pockets. Semisweet or dark chocolate chips also work for a less sweet cookie. For a more decadent result, use chopped chocolate bars instead of chips.
Kitchen Tools You’ll Need for Butterfinger Cookies
- Stand mixer or hand mixer: For creaming butter and sugars until fluffy.
- Baking sheets: Light-colored ones prevent over-browning.
- Silpat baking mat or parchment paper: Ensures cookies release easily.
- Cookie scoop (2-tablespoon size): For uniform portions and even baking.
- Cooling rack: Allows cookies to cool and set completely.
Tips for Baking Perfect Soft Peanut Butter Butterfinger Cookies
For the softest cookies, cream the butter, peanut butter, and sugars for a full 3 minutes until light and fluffy. That step aerates the dough and helps cookies rise. When you add the dry ingredients, mix only until the flour disappears, overmixing develops gluten and makes cookies tough. I like to slightly flatten each dough ball with my palm before baking to ensure even spreading. Watch the edges; the moment they turn golden, pull the pan out. The cookies will set as they cool on the sheet for 4-5 minutes, so don’t let them overbake.
Expert Tricks for the Best Butterfinger Cookies
Use a cookie scoop to portion the dough, it gives you uniform cookies that bake at the same rate. If your Butterfinger bars are a little stale, spread the chopped pieces on a baking sheet and toast at 350°F for 3 minutes. That revives the crunch and intensifies the toffee flavor. For a salted twist, sprinkle a pinch of flaky sea salt on each cookie right when they come out of the oven. It balances the sweetness and adds a sophisticated touch.
Fun Variations for Butterfinger Cookies
If you want to switch things up, swap the milk chocolate chips for dark or white chocolate. For extra crunch, use crunchy peanut butter instead of creamy. To make a gluten-free version, replace the all-purpose flour with a 1:1 gluten-free baking blend. No Butterfinger on hand? Any crisp toffee candy bar, like Skor or Heath, works great. You can also add a handful of chopped peanuts for even more texture.
Serving Ideas for Peanut Butter Butterfinger Cookies
These cookies are perfect with a cold glass of milk, but they also shine alongside a scoop of vanilla ice cream for an ice cream sandwich. For a dessert board, arrange them with fresh berries and a drizzle of melted peanut butter. They hold up well in lunchboxes too, though they rarely last that long.
How to Store Leftover Butterfinger Cookies
Store the baked cookies in an airtight container at room temperature. They stay fresh for up to 5 days. To keep them extra soft, add a slice of bread to the container, it absorbs excess air and releases moisture, which keeps the cookies tender. Replace the bread slice every couple of days.
Freezing Peanut Butter Butterfinger Cookie Dough and Baked Cookies
Freeze unbaked dough balls on a baking sheet until solid, then transfer to a freezer bag. You can bake them directly from frozen, just add 1-2 minutes to the baking time. For baked cookies, freeze in a single layer in a freezer bag for up to 3 months. Thaw at room temperature or warm in a low oven before serving.
How to Reheat Butterfinger Cookies for Freshness
To bring back that fresh-from-the-oven texture, warm the cookies in a 300°F oven for 3-5 minutes. A microwave works too, 10 to 15 seconds will soften them and remelt the chocolate chips. Don’t overheat or the chocolate will seize. If you’re reheating frozen baked cookies, let them thaw first or add a few extra seconds in the microwave.
Frequently Asked Questions About Butterfinger Cookies
Can I use natural peanut butter in these cookies?
Natural peanut butter tends to separate and has a looser consistency, which can cause the cookies to spread more and become greasy. For best results, use a commercial creamy peanut butter like Jif or Skippy. If you only have natural, stir it well and reduce the butter by 1 tablespoon to compensate for the extra oil.
Why did my cookies spread too much?
Overly flat cookies often result from dough that was too warm or too much butter. Make sure your butter is softened but not melted. Chilling the dough balls for 30 minutes before baking can help control spread. Also, measure flour correctly by spooning it into the cup and leveling it off, too little flour leads to spreading.
Can I make these cookies without Butterfinger?
Absolutely. Substitute any crunchy toffee candy bar like Skor, Heath, or even chopped up peanut butter cups. You can also use crushed pretzels or toffee bits for a similar salty-sweet crunch. The cookie base is versatile, so feel free to get creative with your leftover candy.
How do I chop Butterfinger bars without making a mess?
Place the unwrapped bars in a zip-top bag and gently crush them with a rolling pin or the bottom of a pan. This contains the crumbs and makes clean-up easy. Alternatively, use a serrated knife to saw the bars on a cutting board, the serrated edge helps break the brittle candy without shattering it everywhere.
Recipe
Peanut Butter Butterfinger Cookies

Peanut Butter Butterfinger Cookies-soft peanut butter cookies with Butterfinger candy bars and milk chocolate chips! Use your leftover Halloween candy to make these delicious cookies!
Ingredients
- 1.25 cup all-purpose flour
- 0.5 tsp baking soda
- 0.5 tsp baking powder
- 0.5 tsp salt
- 0.5 cup unsalted butter, at room temperature
- 0.5 cup creamy peanut butter
- 0.5 cup light brown sugar
- 0.5 cup granulated sugar
- 1 large egg
- 1 tsp vanilla extract
- 1 cup chopped Butterfinger candy bars
- 1 cup milk chocolate chips
Instructions
- 1
Preheat oven to 350 degrees F. Line a baking sheet with a Silpat baking mat or parchment paper and set aside.
- 2
In a medium bowl, whisk together flour, baking soda, baking powder, and salt. Set aside.
- 3
Using a stand mixer, cream the butter and peanut butter together until combined. Add the sugars and beat until creamy and smooth, about 3 minutes. Add in the egg and vanilla extract. Mix until combined.
- 4
With the mixer on low, slowly add in the dry ingredients. Mix until just combined. Stir in the chopped Butterfinger candy bars and milk chocolate chips.
- 5
Take about 2 tablespoons of dough and form a cookie dough ball. Place cookies on prepared baking sheet, about 2-inches apart. Slightly press down on the cookie balls with the palm of your hand.
- 6
Bake the cookies for 10 minutes or until they are golden at the edges and just set. Don’t over bake, the cookies will set up as they cool. Remove pan from oven and let cookies cool on the baking sheet for 4-5 minutes. Transfer to a cooling rack and cool completely.
Nutrition (per serving)
Calorie breakdown
How this was calculated — 12 of 12 ingredients matched
Nutrition information is automatically calculated from USDA FoodData Central, so should only be used as an approximation. Actual values may vary depending on the ingredients, brands, and preparation methods used.
Open in analyzerKeyword: Chocolate, cookie, dessert, Oven Baked, peanut butter, vegetarian
This post may contain affiliate links. Read our disclosure policy.
Share this recipe
You Might Also Like
View All →


About the Author
NutriforksNutriForks is a home-cooking site built around two simple ideas: recipes should actually work, and you should know what’s in them. Every recipe pairs clear, tested instructions with a full nutrition breakdown, so healthy, everyday cooking is genuinely easy.