No-Churn Biscoff Ice Cream

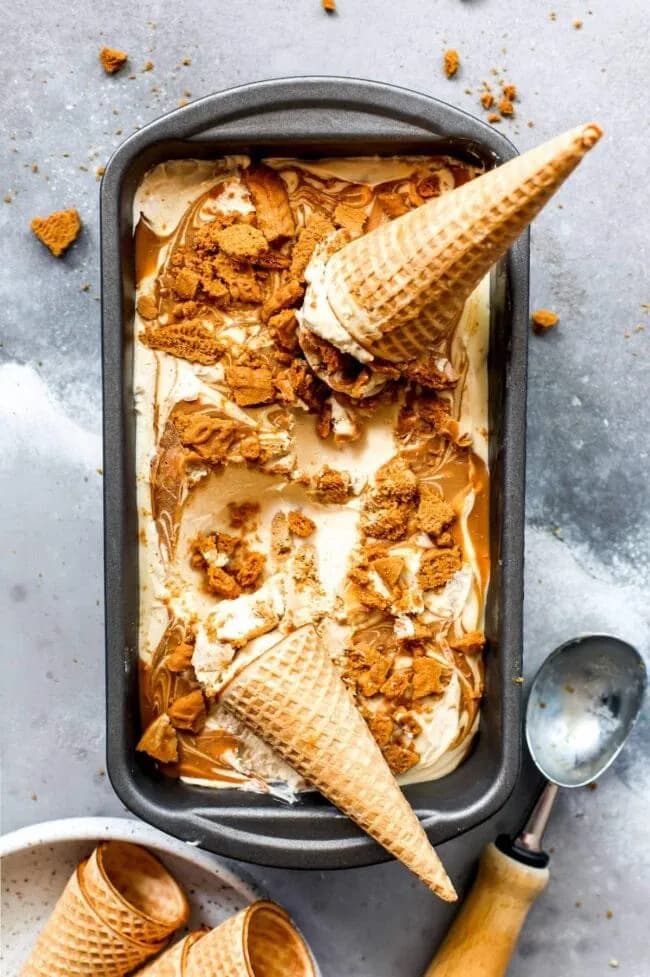
Make this No-Churn Biscoff Ice Cream with just 5 ingredients and no machine! Creamy, swirled with Biscoff spread, and loaded with cookie crunch. Perfect summer treat.
Continue the meal with Strawberry Sour Cream Ice Cream or Two-Ingredient Banana Peanut Butter Ice Cream.
What Makes This No-Churn Biscoff Ice Cream So Good
If you love no-churn biscoff ice cream, you’re in for a treat. This version uses sweetened condensed milk and heavy whipping cream to create a base that’s impossibly creamy without an ice cream machine. Dollops of melted Biscoff spread are swirled through, and crushed Biscoff cookies add crunch. It’s a summer dessert that comes together in minutes.
Why You’ll Love This Easy Homemade Ice Cream
- No ice cream machine needed, just a mixer and freezer space.
- Only five main ingredients, most of which are pantry staples.
- The swirled Biscoff spread and crunchy cookie bits give every spoonful incredible texture and that warm spiced flavor.
Key Ingredients for Creamy No-Churn Ice Cream
- Sweetened condensed milk provides sweetness and a creamy body without cooking a custard. Use full-fat for best results.
- Biscoff spread is a sweet, spiced cookie butter with notes of cinnamon and caramel. Look for it near the peanut butter. Choose the creamy version for easy swirling.
- Heavy whipping cream whips into stiff peaks, giving the ice cream its light, airy structure. Don’t substitute with half-and-half; it won’t whip properly.
Kitchen Tools for No-Churn Ice Cream
- Electric mixer, essential for whipping cream to stiff peaks.
- 9×5-inch loaf pan or freezer-safe container, shallow enough to freeze quickly and evenly.
- Microwave-safe bowl, for melting the Biscoff spread.
- Knife, for swirling the spread through the layers.
Tips for Making the Best No-Churn Biscoff Ice Cream
Whip the heavy cream until stiff peaks form, but stop before it turns grainy. Gently fold the whipped cream into the condensed milk mixture, deflating the batter will make the ice cream dense. For the swirl, microwave the Biscoff spread just until it’s loose enough to dollop, but not hot. Let it cool slightly before layering.
Expert Tips for Perfect Biscoff Swirls
When layering the ice cream, start with a third of the mixture, then add small dollops of melted Biscoff. Repeat, using a knife to gently create figure-eight motions through the layers, don’t over-swirl or you’ll lose the distinct ribbons. Chill the pan on a level freezer shelf so the cookies stay evenly distributed.
No-Churn Biscoff Ice Cream Variations to Try
Try swapping the Biscoff spread for another cookie butter like speculoos or even Nutella. Fold in chocolate chips or toasted pecans for extra crunch. For a salty-sweet twist, sprinkle flaky sea salt on top before freezing.
Best Ways to Serve This Creamy Ice Cream
Scoop this ice cream onto a warm chocolate brownie for a decadent sundae. A handful of fresh raspberries adds a tart contrast. Or simply serve in a waffle cone with extra crushed Biscoff cookies on top.
How to Store Leftover No-Churn Biscoff Ice Cream
Transfer any leftover ice cream to an airtight container. Press a piece of plastic wrap directly onto the surface to prevent ice crystals. Store in the freezer for up to 2 weeks for best texture. If it gets too hard, let it sit at room temperature for 5 minutes before scooping.
Freezing Tips for No-Churn Biscoff Ice Cream
The ice cream needs at least 6 hours in the freezer to firm up, but overnight is even better. If you’re making it ahead, you can freeze it for up to a month. Just wrap the pan tightly in plastic wrap and then foil to prevent freezer burn. When ready to serve, let it sit on the counter for 10 minutes to soften slightly for easy scooping.
No-Churn Biscoff Ice Cream FAQs
Can I use crunchy Biscoff spread instead of creamy?
Yes, but crunchy spread has cookie bits already. You may want to adjust the amount of added chopped cookies to avoid too much crunch. The texture will be different but still delicious.
Why did my ice cream turn icy?
Icy ice cream usually means the whipped cream was over beaten or the mixture wasn’t frozen quickly enough. Make sure your freezer is set to 0°F (-18°C) and that the pan is placed on a level, cold surface.
Can I make this without an electric mixer?
You can whip the heavy cream by hand with a whisk, but it will take some arm effort. Chill the bowl and beaters first to speed things up. Or use a stand mixer for easiest results.
How do I get clean scoops?
Dip your ice cream scoop in hot water before each scoop. Also, let the ice cream sit at room temperature for 5-10 minutes to soften just enough to scoop without cracking the cookies.
Recipe
No-Churn Biscoff Ice Cream

A smooth and creamy ice cream with dollops of Biscoff spread is going to become your new favorite summertime treat! No-Churn Biscoff Ice Cream is so easy to make and even easier to love.
Ingredients
- 14 oz sweetened condensed milk
- 1 cup Biscoff spread, divided
- 2 cup heavy whipping cream
- 0.5 tsp vanilla extract
- 1 cup chopped Biscoff cookies, chopped
- additional chopped Biscoff cookies, for garnish
Instructions
- 1
In a large bowl, combine the sweetened condensed milk and ½ cup of the Biscoff spread. Stir until smooth. Set aside.
- 2
Place the remaining ½ cup of Biscoff spread in a microwave safe bowl and microwave for 30 seconds, or until slightly melted and smooth. Set aside to cool slightly.
- 3
In the bowl of an electric mixer fitted with the whisk attachment, beat the heavy cream and vanilla on high speed until stiff peaks form.
- 4
Fold the whipped cream into the Biscoff and sweetened condensed milk mixture until combined. Gently stir in 1 cup of the chopped Biscoff cookies.
- 5
Layer the ice cream in a 9×5-inch loaf pan or freezer-safe container. Start with about ⅓ of the mixture and then add dollops of the melted Biscoff spread. Top with more of the ice cream mixture and more dollops of Biscoff and so on until all of the ice cream and Biscoff is in the container. Use a knife to gently swirl the mixture. Top with additional chopped Biscoff cookies.
- 6
Cover the pan tightly with plastic wrap. If your container has a lid, you can also put the lid on. Freeze for 6 to 8 hours, or until the ice cream is firm. Scoop and enjoy!
Nutrition (per serving)
Calorie breakdown
How this was calculated — 4 of 6 ingredients matched
Nutrition information is automatically calculated from USDA FoodData Central, so should only be used as an approximation. Actual values may vary depending on the ingredients, brands, and preparation methods used.
Open in analyzerKeyword: easy, No-Cook, vegetarian
This post may contain affiliate links. Read our disclosure policy.
Share this recipe
You Might Also Like
View All →



About the Author
NutriforksNutriForks is a home-cooking site built around two simple ideas: recipes should actually work, and you should know what’s in them. Every recipe pairs clear, tested instructions with a full nutrition breakdown, so healthy, everyday cooking is genuinely easy.