Milk Kefir

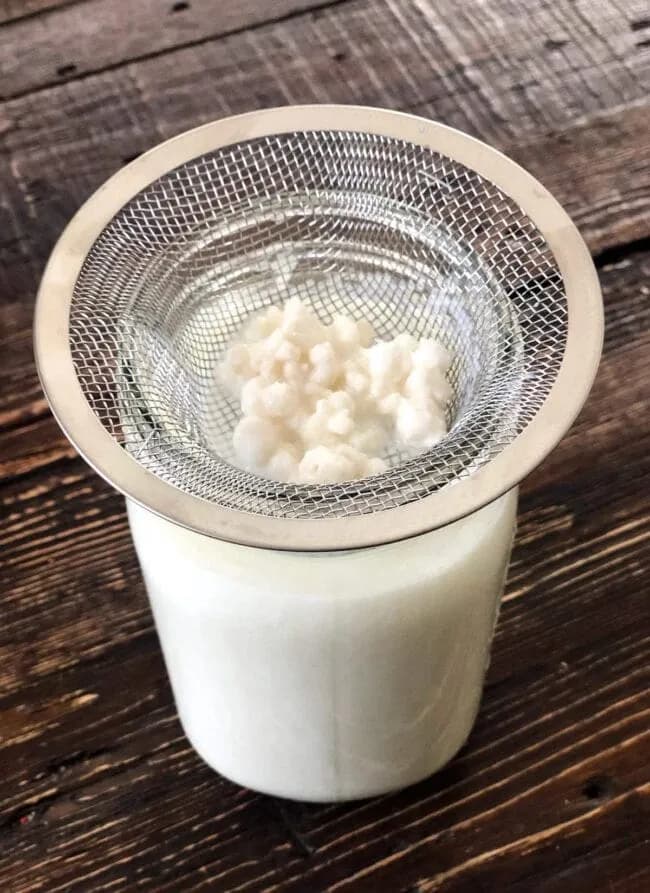
Learn how to make milk kefir at home with this easy recipe. Enjoy a probiotic-rich, tangy fermented drink that’s better than store-bought. Get started today!
Making Your Own Probiotic-Rich Kefir at Home
I’ve been making milk kefir at home for over a year now, and it’s become a staple in my daily routine. The process is simpler than you might think, and the results are a tangy, creamy probiotic drink that blows store-bought versions out of the water. With just two ingredients and a little patience, you can have a steady supply of gut-friendly kefir.
Why You’ll Love This Homemade Kefir Recipe
- It’s incredibly easy to make, just grains and milk, no special equipment required.
- The probiotic content is huge, especially if you do a second fermentation with fruit.
- It’s much cheaper than buying kefir at the store, and you can control the ingredients.
Kefir Grains and Fresh Milk: Key Ingredients
- Kefir Grains, These live cultures are the heart of the recipe. You can buy them online, from a health food store, or get some from a friend who makes kefir. They look like small cauliflower florets and are reusable.
- Fresh Milk, Whole milk gives the creamiest, richest kefir, but 2% or skim work too. Avoid ultra-pasteurized milk if possible; it can slow fermentation. Raw milk is great if you can find it.
Kitchen Tools for Making Milk Kefir
- Glass Jar, A 1-quart jar works perfectly. Make sure it’s clean.
- Plastic Lid or Coffee Filter, Use a lid that you can leave loose, or cover the jar with a coffee filter and rubber band to allow airflow.
- Sieve and Bowl, A stainless steel or plastic strainer (avoid metal) and a clean bowl or jar to catch the kefir.
- Spoon, A plastic or silicone spoon for stirring, if needed.
Tips for Making Milk Kefir at Home
Temperature matters, I keep my jar in a warm spot around 70-75°F, like a cabinet near the stove. If your kitchen runs cooler, the fermentation might take up to 48 hours. Never tighten the lid; the kefir needs air to ferment properly. You’ll know it’s done when the milk thickens a little and smells pleasantly tangy, like buttermilk. Before straining, give the jar a good shake to mix any separated curds.
Expert Tips for Perfect Kefir Every Time
To keep your kefir grains healthy, use non-chlorinated water if you ever need to rinse them (which is rare). I just transfer the grains directly to fresh milk each batch. Avoid metal utensils, use plastic, silicone, or glass. If you want a thicker kefir, let it ferment a few hours longer, but watch for separation (whey on bottom). Over-fermented kefir is still good; use it in baking or smoothies. If you need a break, store grains in fresh milk in the fridge for up to a week, or freeze them for longer.
Flavor Variations for Your Kefir
The simplest variation is a second fermentation: after straining, add fresh or frozen fruit (like berries, mango, or banana), seal the jar, and leave it on the counter for 2 to 5 hours. This boosts the probiotic count and adds natural sweetness. You can also stir in a little vanilla extract or honey after straining. For a dairy-free option, use coconut milk, but note that kefir grains need dairy to survive long-term, you can alternate between dairy and coconut milk. Another idea: blend the finished kefir with fruit for a quick smoothie.
Delicious Ways to Enjoy Your Kefir
I drink my kefir straight, first thing in the morning. It’s tart and refreshing, like a thin yogurt. You can pour it over granola with fresh berries for a quick breakfast, or use it as a base for smoothies, add banana and spinach for a green probiotic boost. It also works well in salad dressings (substitute for buttermilk) or marinades for chicken. For a simple treat, stir in a little honey and top with toasted nuts.
How to Store Homemade Kefir
Store finished kefir in a clean, airtight jar in the refrigerator. It will keep for 1 to 2 weeks, though it will continue to slowly ferment and become more tangy. Shake well before serving, because separation is natural. If you see a little whey at the bottom, that’s fine, just stir it back in.
Can You Freeze Milk Kefir?
Yes, you can freeze kefir for longer storage, but the texture may change slightly, it can become a bit grainy after thawing. For best results, pour kefir into ice cube trays and freeze. Use the cubes in smoothies or for cooking. If you need to freeze your kefir grains (to take a break from making kefir), place them in a small jar with enough milk to cover them, seal, and freeze for up to 3 months. Thaw in the fridge and refresh with a few batches of fresh milk before using again.
Common Questions About Making Kefir
Where can I buy kefir grains?
You can purchase kefir grains online from specialty food sites, at some health food stores, or through local fermentation groups. They are often shared among home fermenters. Avoid using powdered starter, live grains are reusable.
Can I use low-fat or non-dairy milk?
Yes, but whole milk produces the creamiest kefir. Non-dairy milks like coconut or almond milk require extra care, the grains need dairy to survive long-term, so you must alternate with dairy milk every few batches, or use a dedicated non-dairy culture.
How do I know when the kefir is done?
After about 24 hours at room temperature, the milk should thicken slightly and smell tangy, like yogurt or buttermilk. The consistency will be pourable, not solid. If it separates into curds and whey, it’s over-fermented but still usable.
My kefir separated, is it safe?
Yes, separation is natural. Just give it a good shake or whisk before drinking. Over-fermented kefir is more sour but fine to consume. If it smells off or shows mold, discard it and start with fresh grains.
How often do I need to make kefir to keep grains alive?
Ideally, every 24-48 hours. If you need a break, place the grains in fresh milk and refrigerate for up to a week. For longer breaks, freeze them in milk. When you resume, expect a batch or two to adjust before the kefir is back to its usual tang.
Recipe
Milk Kefir
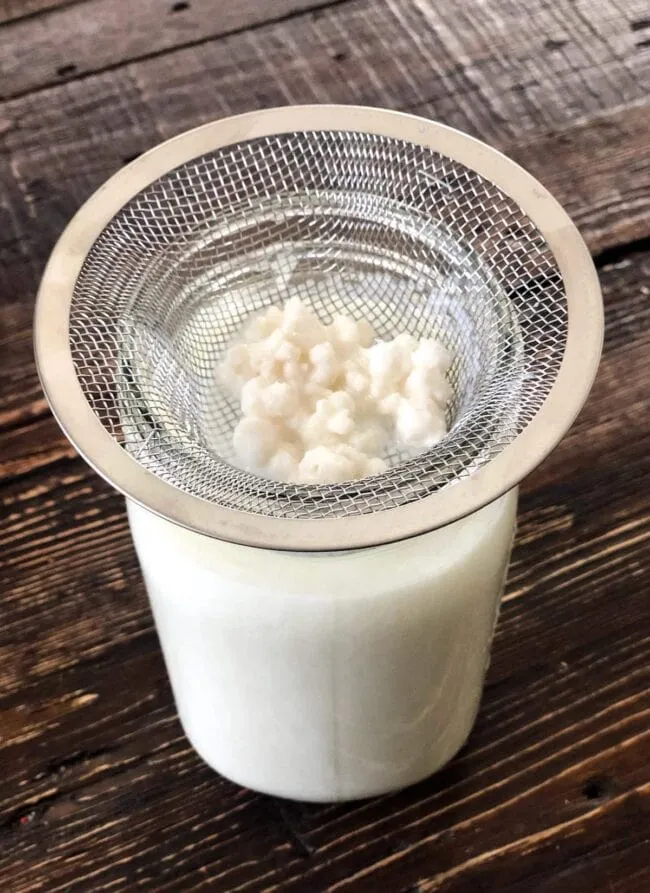
How to make milk kefir, a probiotic-rich fermented drink that has lots of health benefits! It's easy to make at home and so much better than store bought kefir.
Ingredients
- 2 tsp kefir grains
- 3 cup fresh milk
Instructions
- 1
Put kefir grains, about 2 teaspoons of grains, into a clean glass jar with about 3 cups fresh milk. Make sure you leave about 1-inch of room at the top of the jar.
- 2
Place a plastic lid on top of the jar, but do not tighten it. You want the lid to be loose on top of the jar.
- 3
Place the jar in a warm place, out of direct sunlight, for 24 hours. I put my jar in a cabinet in our kitchen. You will know your kefir is done when it has slightly thickened and smells fermented.
- 4
Tighten the lid and shake well. Place a stainless-steel strainer or plastic strainer over a clean jar. Strain the kefir into the jar.
- 5
At this point, you can add fresh or frozen fruit if you want to do a second fermentation. I add ½ banana and then put the lid on tight and let the kefir sit out on the counter for another 2 to 5 hours. This will double the amount of probiotics. If you don’t want to do the second fermentation, you can put the lid on and store the kefir in the refrigerator.
- 6
Now, you start the process over again with the kefir grains you have in the strainer. Put the kefir grains in a clean jar, add milk, put the lid on (but not tight) and repeat the process.
Nutrition (per serving)
Calorie breakdown
How this was calculated — 2 of 2 ingredients matched
Nutrition information is automatically calculated from USDA FoodData Central, so should only be used as an approximation. Actual values may vary depending on the ingredients, brands, and preparation methods used.
Open in analyzerKeyword: fermented, gluten-free, glutenFree, nutFree, probiotic, vegetarian
This post may contain affiliate links. Read our disclosure policy.
Share this recipe

About the Author
NutriforksNutriForks is a home-cooking site built around two simple ideas: recipes should actually work, and you should know what’s in them. Every recipe pairs clear, tested instructions with a full nutrition breakdown, so healthy, everyday cooking is genuinely easy.