Maple Scones

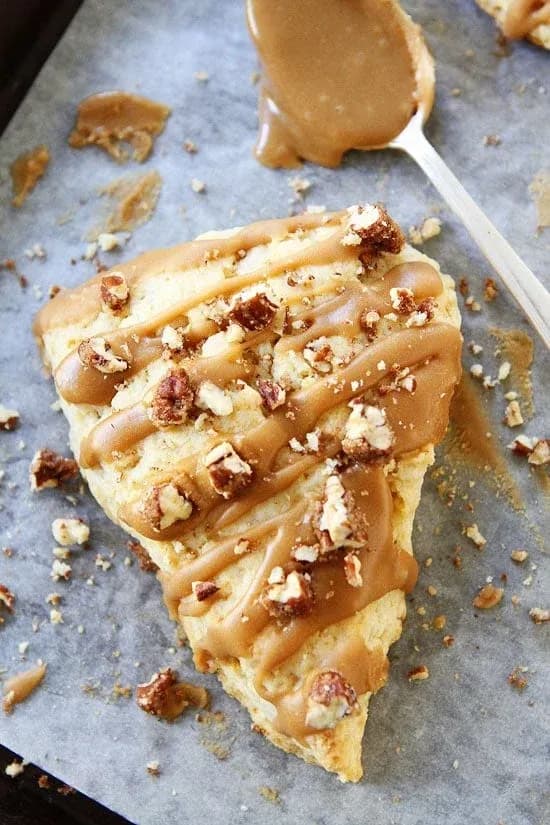
These maple scones are tender, buttery, and topped with a sweet maple glaze. Ready in under 30 minutes, a perfect maple bar alternative!
A natural next stop: Toasted Coconut Lemon Scones, Lemon Blueberry Scones, Leftover Cranberry Sauce Muffins, or Blackberry Scones.
A Maple Bar Craving That Turned Into Scones
Josh has a serious weakness for maple bars. Our local shop makes the best, but he’ll settle for a grocery store version if he’s desperate. One Saturday he ran out for groceries and came back empty-handed, no donut, no maple bar. They were sold out. He looked so defeated that I almost felt sorry for him. Almost.
Instead of sulking, he got to work making these maple scones. Heavy cream and butter make them tender and rich, and the maple glaze is exactly what you’d want from a maple bar alternative. He brought me one warm from the oven while I was working, and I forgot all about his donut habit.
Why These Maple Scones Are a Keeper
- Heavy cream and butter create a tender, flaky crumb without needing buttermilk or special tricks.
- The maple glaze tastes just like the icing on a maple bar, sweet, buttery, and maple-forward.
- They come together fast: you can have warm scones on the table in under 30 minutes, no yeast or rising required.
Key Ingredients for Maple Scones
- Heavy cream: This is the liquid fat that makes scones tender and flaky. Don’t use half-and-half or milk, the fat content isn’t high enough. If you must substitute, use full-fat canned coconut cream for a dairy version, but results vary.
- Pure maple syrup: Use the real thing, not pancake syrup. Grade A amber or dark works best. The syrup adds sweetness and that unmistakable maple flavor. Do not substitute with honey or corn syrup, the flavor profile will change completely.
- Unsalted butter: Keep it cold and cut it in quickly. Salted butter can be used if you reduce the added salt in the recipe by 1/4 teaspoon. The butter creates those tiny pockets of steam that lift the scone as it bakes.
Kitchen Tools for Maple Scones
- Large baking sheet with sides to catch any glaze drips
- Parchment paper or a Silpat for nonstick baking
- Pastry blender, two knives, or your hands to cut butter into flour; your hands work well if you work quickly to avoid warming the butter
- Bench scraper (optional but helpful) for cutting the dough into wedges cleanly
Tips for the Best Maple Scones
Start with very cold butter and heavy cream straight from the fridge. Warm butter will melt into the flour before baking, making scones dense instead of flaky. When you cut in the butter, stop as soon as the mixture looks like coarse meal with a few pea-sized butter pieces left, those little pockets create steam pockets in the oven.
Mix the dough just until it comes together. Overworking develops gluten and turns scones tough. It’s okay if it looks a little shaggy; press it gently into a round on a floured surface, then cut. For neat wedges, use a bench scraper to push straight down instead of twisting the knife.
Easy Variations for Maple Scones
If you don’t have maple extract, use vanilla extract instead, the scones will be less maple-y but still delicious. For a nuttier flavor, fold 1/3 cup of chopped toasted pecans into the dry ingredients before adding the cream. To make these dairy-free, substitute the heavy cream with full-fat coconut cream and use a solid vegan butter alternative; the texture will be slightly different but still good. Gluten-free? Swap the all-purpose flour for a 1-to-1 gluten-free baking blend and add an extra tablespoon of cream if the dough seems dry.
How to Serve Maple Scones
These scones are best warm, straight from the oven, but they’re also great at room temperature with a cup of strong coffee. Top them with chopped candied pecans for crunch, the sweet nuts echo the maple glaze. If you want to go all out, drizzle a little extra maple syrup over the glaze just before serving. They’re sweet enough on their own, but a side of fresh berries or sliced apple balances the richness nicely.
Storing Leftover Maple Scones
Store baked scones in an airtight container at room temperature for up to 2 days. They’ll stay soft but the glaze might get a little tacky, that’s fine. If you live in a humid climate, refrigerate them to keep the glaze from melting; bring to room temperature before serving. For longer storage, freeze as described below.
How to Freeze Maple Scones
Freeze baked, completely cooled scones in a single layer on a baking sheet until solid, then transfer to a freezer bag or airtight container. They keep for up to 3 months. To thaw, leave at room temperature for about 30 minutes, then reheat in a 350°F oven for 5 minutes to restore crispness. You can also freeze unbaked scone wedges on a lined baking sheet, then pop them into a bag. Bake from frozen, adding 2-3 minutes to the baking time.
Best Way to Reheat Maple Scones
For scones that taste freshly baked, reheat them in a 350°F oven for 5 to 8 minutes. A toaster oven works too, just watch the glaze so it doesn’t burn. Microwaving will soften the scone and make the exterior soggy, only do it if you’re in a rush and don’t mind the texture. If you reheat from frozen, add a couple minutes to the oven time.
Common Questions About Maple Scones
Can I use milk instead of heavy cream?
You can, but the scones will be less tender and rich. Heavy cream gives scones their signature flaky texture because of its high fat content. If you substitute milk, use whole milk and reduce the amount by about 2 tablespoons to avoid a sticky dough.
Do I have to use maple extract?
Maple extract boosts the maple flavor without adding liquid. Pure maple syrup alone is subtle in baked goods. If you skip the extract, the glaze will taste more like sweet butter than maple. You can use vanilla extract as a substitute for a different flavor.
My scones turned out dry. What went wrong?
Dry scones usually come from overmixing or too much flour. Measure your flour by spooning it into the cup and leveling it off, not scooping. Mix the dough until it just holds together, if it seems dry, add a teaspoon more cream. Also, make sure your oven temperature is accurate; a too-hot oven can dry the outside before the inside is done.
Can I make the dough ahead of time?
Yes. Shape the scone wedges, place them on a parchment-lined baking sheet, and refrigerate for up to 24 hours. Bake straight from the fridge, adding a minute or two to the baking time. You can also freeze the shaped dough for longer storage.
Recipe
Maple Scones

Maple Scones-tender, buttery scones with a sweet maple glaze! Top with chopped up candied pecans for an extra special scone.
Ingredients
scones
- 2 cup all-purpose flour
- 1 tbsp baking powder
- 3 tbsp light brown sugar
- 0.5 tsp salt
- 6 tbsp unsalted butter, cold, cut into 1/4-inch cubes
- 0.75 cup heavy cream
- 1 large egg, slightly beaten
- 0.5 tsp vanilla extract
maple glaze
- 0.25 cup unsalted butter
- 0.25 cup pure maple syrup
- 2 tbsp heavy cream
- 1 tsp maple extract
- 1.333 cup powdered sugar
topping
- candied pecans, chopped
Instructions
- 1
Preheat oven to 400 degrees F. Line a large baking sheet with parchment paper or a Silpat baking mat and set aside.
- 2
In a large bowl, whisk together flour, baking powder, brown sugar, and salt. Quickly cut in the butter, using your hands, two knives, or a pastry blender. Mix until mixture resembles coarse meal, with a few larger butter lumps.
- 3
In a small bowl, whisk together ¾ cup heavy cream, the egg, and vanilla extract. Pour the mixture over the ingredients and stir with a spatula until dough begins to form. Don’t over mix.
- 4
Transfer dough to a floured countertop
Nutrition (per serving)
Calorie breakdown
How this was calculated — 14 of 14 ingredients matched
Nutrition information is automatically calculated from USDA FoodData Central, so should only be used as an approximation. Actual values may vary depending on the ingredients, brands, and preparation methods used.
Open in analyzerKeyword: breakfast, maple, Oven Baked, scones, vegetarian
This post may contain affiliate links. Read our disclosure policy.
Share this recipe
You Might Also Like
View All →

About the Author
NutriforksNutriForks is a home-cooking site built around two simple ideas: recipes should actually work, and you should know what’s in them. Every recipe pairs clear, tested instructions with a full nutrition breakdown, so healthy, everyday cooking is genuinely easy.