Granola Bars

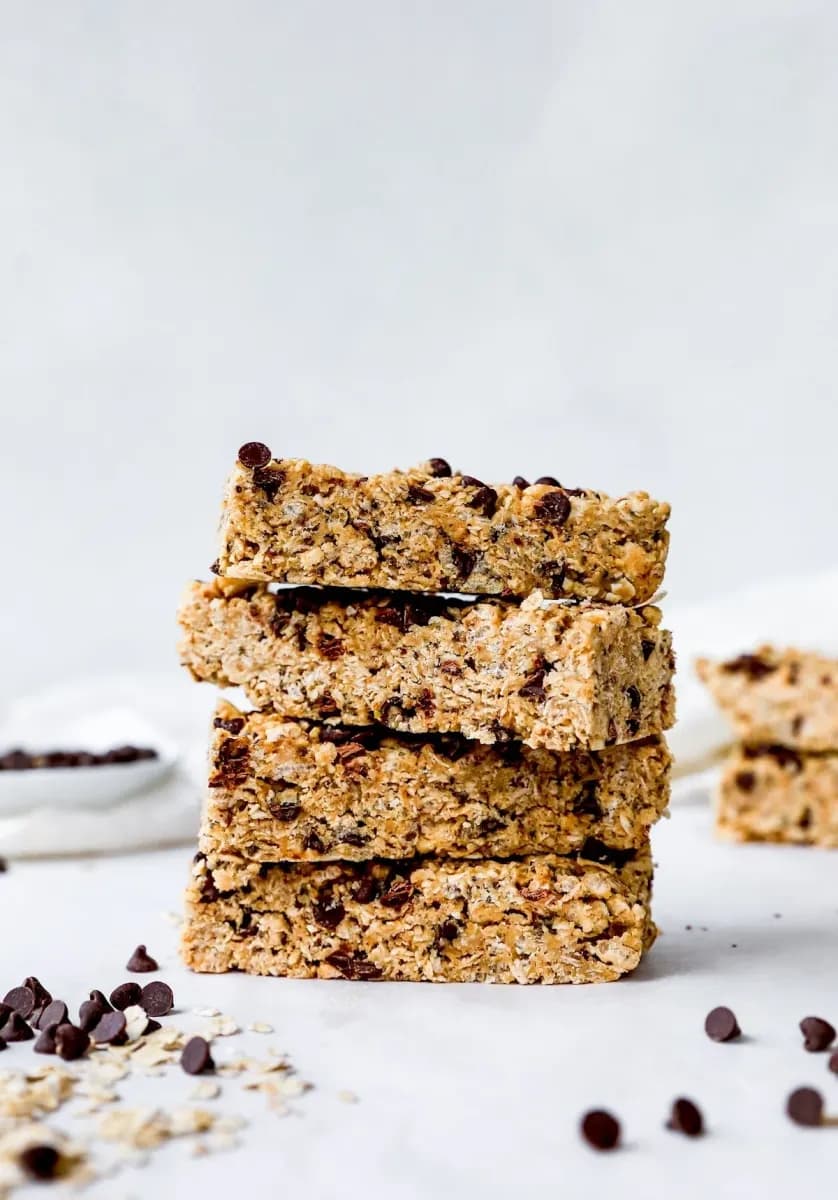
These no-bake Peanut Butter Chocolate Chip Granola Bars are easy to make and taste amazing. Perfect for lunchboxes or a quick snack. Get the recipe!
Sharing a vegetarian theme with this one: Rhubarb Berry Crisp, Mandarin Orange Salad, Golden Grahams S’mores Bars, and No-Bake Peanut Butter Pretzel Chocolate Chip Granola Bars.
Why I Always Keep These No-Bake Granola Bars in the Fridge
These no-bake peanut butter chocolate chip granola bars are the ones I keep stocked in my fridge for busy mornings and afternoon slumps. My kids love helping press the mixture into the pan, and I love that they’re full of oats, seeds, and peanut butter instead of mystery ingredients. The combo of creamy peanut butter and mini chocolate chips makes them feel like a treat, even though they’re packed with flaxseed, chia, and coconut. They’ve become our go-to for lunchboxes, road trips, and after-school snacks.
3 Reasons These Homemade Granola Bars Are a Go-To Snack
- No oven required: mix everything in one bowl, press into a pan, and chill. That’s it.
- Wholesome ingredients you can feel good about: oats, seeds, peanut butter, and just enough honey to sweeten.
- Ready in under 15 minutes of active time, then the fridge does the rest.
Key Ingredients for the Best Granola Bar Texture
- Peanut butter: Use a creamy natural kind with just peanuts and salt. Stir it well before measuring to avoid oily separation, which can make the bars greasy.
- Quick oats: They’re smaller than old-fashioned oats and help the bars hold together better. If you only have old-fashioned, pulse them in a food processor a few times.
- Coconut flakes: Unsweetened keeps the bars from being too sweet, but sweetened works if you prefer a sweeter bar. They add a chewy texture and subtle flavor.
Simple Tools You’ll Need for No-Bake Granola Bars
- 8×8-inch baking pan (lined with parchment paper for easy removal)
- Microwave-safe bowl for melting coconut oil
- Glass or jar with a flat bottom for pressing the mixture firmly
How to Keep Your Granola Bars from Crumbling
The most common complaint with homemade granola bars is that they fall apart. Here are three things that help. First, choose quick oats over old-fashioned. They’re smaller and bind together better. If you only have old-fashioned, give them a few pulses in the food processor. Second, after you press the mixture into the pan, use the bottom of a glass to really pack it down. This compacts everything so the bars hold their shape. Third, don’t skip the chilling time. Refrigerate the bars for at least an hour, or overnight, before cutting. Use a sharp knife to get clean edges.
Ways to Customize Your Peanut Butter Chocolate Chip Granola Bars
This recipe is easy to customize. Swap the peanut butter for almond, cashew, or sunflower butter for a nut-free version. For extra crunch, fold in a handful of chopped nuts like almonds or pecans. If you want a colorful twist, replace the chocolate chips with mini M&Ms. Or skip the chocolate entirely and use dried cranberries, raisins, or chopped dried blueberries.
Ways to Enjoy These Granola Bars
These bars are great on their own, but they also work well crumbled over a bowl of Greek yogurt with fresh berries for breakfast. Pack one in a lunchbox next to an apple or a cheese stick for a balanced snack. If you’re heading out for a hike, wrap a couple in a napkin and toss them in your bag. They hold up well at room temperature for a few hours, though I keep mine chilled.
Storing Your Homemade Granola Bars in the Fridge
Store the bars in an airtight container in the refrigerator for up to 10 days. I usually stack them with a piece of parchment between layers to prevent sticking. They firm up nicely in the fridge, so you can grab one straight from the cold and it holds together well.
How to Freeze Granola Bars for Later
To freeze, wrap individual bars tightly in plastic wrap, then place them in a freezer bag or container. They’ll keep for up to a month. When you’re ready to eat, let them thaw in the fridge for a few hours or pop them straight into a lunchbox, they’ll thaw by snack time. I like to keep a stash in the freezer so I always have a homemade option on hand.
Frequently Asked Questions About These No-Bake Granola Bars
Why are my granola bars falling apart?
Most likely because you didn’t press the mixture firmly enough into the pan or you skipped the refrigeration step. Make sure to pack the mixture down well with the bottom of a glass and chill for at least an hour before cutting.
Can I use a different nut butter?
Yes, you can substitute almond butter, cashew butter, or sunflower seed butter (for a nut-free version). Just make sure the nut butter is creamy and well-stirred before using.
How should I store these granola bars?
Keep them in an airtight container in the refrigerator for up to 10 days. You can also freeze them for up to a month. Wrap individually and thaw in the fridge or at room temperature.
Can I use old-fashioned oats instead of quick oats?
Yes, but pulse them in a food processor a few times to make them smaller. This helps the bars hold together better, similar to quick oats.
Recipe
Granola Bars

These no-bake Peanut Butter Chocolate Chip Granola Bars are the BEST homemade granola bars! They are easy to make and SO much better than store bought!
Ingredients
- 0.333 cup coconut oil
- 0.75 cup creamy peanut butter
- 0.333 cup honey
- 1 tsp pure vanilla extract
- 2 cup quick oats
- 1 cup crispy rice cereal
- 0.5 cup coconut flakes
- 2 tbsp flaxseed meal
- 2 tbsp chia seeds
- 0.5 tsp sea salt or kosher salt
- 0.333 cup mini chocolate chips
Instructions
- 1
Line a 8x8-inch baking pan with parchment paper and set aside.
- 2
Put the coconut oil in a large microwave safe bowl. Melt in the microwave for 30 to 50 seconds. Remove the bowl from the microwave and add the peanut butter, honey, and vanilla extract. Stir until smooth. Add the oats, crispy rice cereal, coconut, flaxseed, chia seeds, and salt. Fold in the mini chocolate chips.
- 3
Transfer the mixture to the prepared pan. Press down with your hands and then use the bottom of a glass or jar to press the mixture firmly until the bars are packed down in the pan. This will help them hold together.
- 4
Cover the bars with plastic wrap and place in the refrigerator for 1 hour or overnight before cutting them. When ready to cut, lift the bars out of the pan using the parchment paper. Use a sharp knife to cut the bars into bars or squares.
Nutrition (per serving)
Calorie breakdown
How this was calculated — 11 of 11 ingredients matched
Nutrition information is automatically calculated from USDA FoodData Central, so should only be used as an approximation. Actual values may vary depending on the ingredients, brands, and preparation methods used.
Open in analyzerKeyword: chocolate chip, no-bake, No-Cook, peanut butter, snack, vegetarian
This post may contain affiliate links. Read our disclosure policy.
Share this recipe
You Might Also Like
View All →

About the Author
NutriforksNutriForks is a home-cooking site built around two simple ideas: recipes should actually work, and you should know what’s in them. Every recipe pairs clear, tested instructions with a full nutrition breakdown, so healthy, everyday cooking is genuinely easy.