Cocoa Fudge Cookies

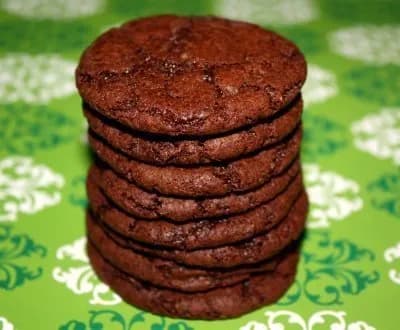
These cocoa fudge cookies are soft, chewy, and surprisingly healthy thanks to yogurt. Get the easy recipe for a low-calorie chocolate treat!
Continue the meal with Flourless Chocolate Cookies, Dorie’s World Peace Cookies, Oatmeal Cookies with White Chocolate and Dried Cranberries, or Crispy Chocolate Chip Oatmeal Cookies.
Why These Cocoa Fudge Cookies Are So Soft and Chewy
These cocoa fudge cookies show how a simple swap can change everything. Instead of loading up on butter, this recipe uses plain low-fat yogurt to keep the cookies tender and moist. The result is a soft, chewy chocolate cookie that tastes indulgent but is actually lower in calories. The cocoa gives them a deep fudge flavor, and the combination of white and brown sugars adds just the right sweetness. They come together quickly, using just one saucepan and a bowl.
Why You’ll Love These Healthy Cookies
- They’re lower in calories than traditional fudge cookies, thanks to yogurt replacing some butter.
- You get a rich, fudgy chocolate flavor without any complicated steps.
- The cookies stay soft and chewy for days, if they last that long.
Key Ingredients for These Low Calorie Cookies
- Unsweetened cocoa powder: This gives the cookies their deep chocolate flavor. Use natural or Dutch-process. Dutch-process will be darker and less acidic. Store cocoa in a cool, dry place to prevent clumping.
- Plain low-fat yogurt: The secret to keeping these cookies soft and low in fat. It adds moisture and a slight tang. Do not use flavored yogurt. If using Greek yogurt, thin it with a tablespoon of milk.
- Butter: Just 5 tablespoons provide richness without making the cookies greasy. Melt it gently to avoid browning. You can substitute with a vegan butter stick for a dairy-free version.
Kitchen Tools for Cocoa Fudge Cookies
- Baking sheets (2)
- Baking paper or Silpat liners
- Large saucepan for melting butter
- Dry measuring cups and spoons
- Sifter or fine-mesh strainer
- Wire racks for cooling
Tips for Baking the Best Cocoa Fudge Cookies
Measure your flour correctly by spooning it into the dry measuring cup and leveling with a knife. This prevents packing, which would make the cookies dry. Sift the flour, baking soda, and salt together to remove lumps and ensure even distribution. When you melt the butter, do it over medium heat and remove the pan as soon as it’s melted. Stir in the cocoa and sugars until the mixture looks like coarse sand. That texture is normal. Add the yogurt and vanilla, then the dry ingredients, stirring just until moist. Overmixing can make the cookies tough. Drop the dough by level tablespoons onto prepared baking sheets, spacing them 2 inches apart. Bake for 8 to 10 minutes, until the cookies are almost set. They will look slightly underdone in the center. Let them cool on the pans for 2 to 3 minutes before transferring to wire racks. This resting time firms them up so they don’t fall apart.
Expert Tips for Perfect Cocoa Fudge Cookie Texture
For the deepest chocolate flavor, use Dutch-process cocoa powder if you have it. Natural cocoa works fine too, but Dutch-process gives a smoother, richer taste. The type of yogurt matters: stick with plain low-fat yogurt, not Greek. Greek yogurt is thicker and could make the dough too stiff. If you only have Greek, thin it with a tablespoon of milk. Also, don’t skip the sifting step. Cocoa powder tends to clump, and sifting ensures a smooth, even batter. Finally, if you want a slightly crispier edge, flatten the dough balls a little before baking. For softer cookies, leave them as rounded drops.
Baking with Yogurt: What to Expect
Yogurt is a clever way to cut calories without sacrificing moisture. In this recipe, it replaces some of the butter, but the cookies still turn out tender and fudgy. The yogurt’s acidity also reacts with the baking soda to help the cookies rise slightly. Don’t worry if the dough looks a bit sticky, that’s normal. Just drop it by tablespoons and don’t try to roll it into balls. The cookies will spread a little in the oven. If you want a thicker cookie, chill the dough for 30 minutes before baking. That will reduce spread and give you a more domed shape.
Cocoa Fudge Cookie Variations to Try
Add a handful of chocolate chips or chopped nuts to the dough for extra texture. For a minty twist, stir in 1/2 teaspoon of peppermint extract along with the vanilla. If you want a spicier cookie, add 1/4 teaspoon of cinnamon or a pinch of cayenne. To make these dairy-free, use a plant-based yogurt and a vegan butter substitute. The texture may vary slightly, but they’ll still be delicious. You can also swap the yogurt for an equal amount of sour cream for a tangier flavor.
What to Serve with Cocoa Fudge Cookies
These cookies are great on their own, but they also pair well with a cold glass of milk or a hot cup of coffee. For a dessert plate, serve them alongside a scoop of vanilla ice cream and a few fresh raspberries. The tart berries cut through the rich chocolate. You can also crumble them over yogurt or use them as a base for an ice cream sandwich.
How to Store Leftover Cocoa Fudge Cookies
Store the cookies in an airtight container at room temperature for up to 5 days. Place a sheet of wax paper between layers to prevent sticking. If your kitchen is warm, you can refrigerate them to keep them firm. Let them come to room temperature before serving for the best texture.
Can You Freeze Cocoa Fudge Cookies?
Yes, you can freeze both baked cookies and unbaked dough. For baked cookies, let them cool completely, then place them in a single layer in a freezer-safe bag or container. Freeze for up to 3 months. Thaw at room temperature for about 30 minutes. For the dough, scoop it into tablespoon-sized balls and freeze on a baking sheet until solid. Transfer the frozen dough balls to a bag. Bake from frozen, adding 1 to 2 minutes to the baking time.
Best Way to Reheat Cocoa Fudge Cookies
To bring back that just-baked softness, microwave a cookie for 10 to 15 seconds. For a slightly crisper edge, reheat in a 300°F oven for 5 minutes. Be careful not to overheat, or the cookies will dry out. If you’re reheating from frozen, let them thaw first or add a few extra seconds in the microwave.
Cocoa Fudge Cookie FAQs
Why does this recipe use yogurt?
Yogurt replaces some of the butter to lower the calorie count while keeping the cookies moist and tender. The acidity also reacts with the baking soda to help the cookies rise slightly. Plain low-fat yogurt works best because it adds moisture without too much fat or thickness.
Can I use Greek yogurt instead of plain low-fat yogurt?
Greek yogurt is thicker and has less water, which can make the dough too stiff. If that’s all you have, thin it with a tablespoon of milk before adding it to the mixture. The cookies may spread a bit less, but they’ll still turn out soft.
How do I know when the cookies are done?
Bake for 8 to 10 minutes. The cookies are done when the edges look set and the centers still appear slightly soft and underdone. They will continue to firm up as they cool on the baking sheet for 2 to 3 minutes. Overbaking will make them dry.
Can I double the recipe?
Yes, you can double all ingredients. Use a larger saucepan to melt the butter and mix the dough. You may need to bake in batches, but the baking time stays the same. Just make sure your baking sheets aren’t overcrowded.
What if I don’t have a sifter?
You can use a fine-mesh strainer instead. Place the flour, baking soda, and salt in the strainer and tap it over a bowl. This breaks up any lumps and aerates the flour, which helps the cookies bake evenly.
Can I use margarine instead of butter?
Yes, but choose a stick margarine with at least 80% fat. Tub margarine has more water and can make the cookies spread too much. Melt it the same way as butter. The flavor will be slightly different, but the texture should be similar.
Recipe
Cocoa Fudge Cookies
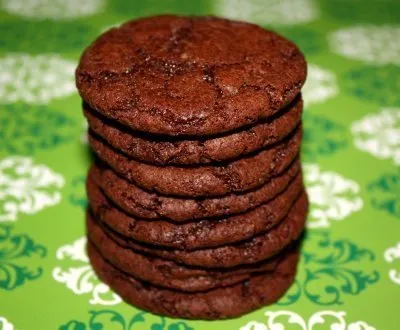
You will love these soft and chewy chocolate cookies!
Ingredients
- 1 cup all-purpose flour
- 0.25 tsp baking soda
- 0.125 tsp salt
- 5 tbsp butter
- 7 tbsp unsweetened cocoa
- 0.667 cup granulated sugar
- 0.333 cup packed brown sugar
- 0.333 cup plain low-fat yogurt
- 1 tsp vanilla extract
Instructions
- 1
Preheat oven to 350ºF; line 2 baking sheets with baking paper, lightly coated with cooking spray. I used Silpats! Lightly spoon flour into a dry measuring cup; level with a knife. Sift together flour, soda, and salt; set aside.
- 2
Melt butter in a large saucepan over medium heat. Remove from heat; stir in cocoa powder and sugars (mixture will resemble coarse sand). Add yogurt and vanilla, stirring to combine. Add flour mixture, stirring until moist. Drop by level tablespoons 2 inches apart onto prepared baking sheets.
- 3
Bake for 8 to 10 minutes or until almost set. Cool on pans 2 to 3 minutes or until firm. Remove cookies from pans; cool on wire racks.
Nutrition (per serving)
Calorie breakdown
How this was calculated — 9 of 9 ingredients matched
Nutrition information is automatically calculated from USDA FoodData Central, so should only be used as an approximation. Actual values may vary depending on the ingredients, brands, and preparation methods used.
Open in analyzerKeyword: Chocolate, cookie, dessert, nutFree, Oven Baked, vegetarian
This post may contain affiliate links. Read our disclosure policy.
Share this recipe
You Might Also Like
View All →

About the Author
NutriforksNutriForks is a home-cooking site built around two simple ideas: recipes should actually work, and you should know what’s in them. Every recipe pairs clear, tested instructions with a full nutrition breakdown, so healthy, everyday cooking is genuinely easy.