Chicken Milanese

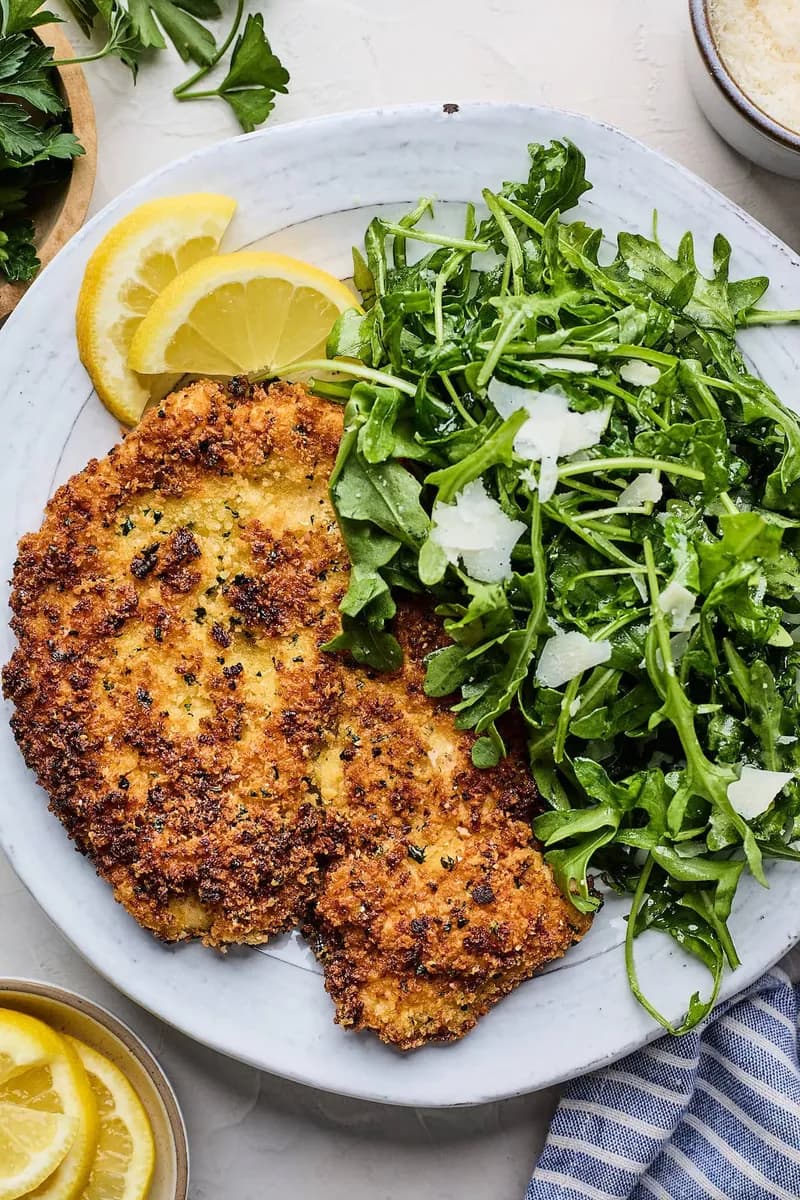
This Chicken Milanese recipe is ready in 30 minutes with a crispy panko-Parmesan crust. Serve with arugula salad for an easy Italian dinner. Get the recipe!
Dinner plans aren’t complete without BBQ Chicken Stuffed Sweet Potatoes or BBQ Chicken Quesadillas.
Why This Chicken Milanese Is a 30-Minute Winner
Chicken Milanese is one of those dishes that feels fancy but comes together in almost no time. Thinly pounded chicken breasts get a crispy, golden crust from a blend of panko and Parmesan, then pan-fried until tender inside. It’s the kind of easy chicken dinner that works for a busy weeknight but looks impressive enough for company. Pair it with a bright arugula salad and you’ve got a complete meal with minimal effort.
What Makes This Chicken Milanese Recipe So Good
- Super crispy outside, juicy inside, pounding the chicken ensures even cooking, and the panko-Parmesan coating gives you maximum crunch without drying out the meat.
- Ready in 30 minutes, from prep to plate, this pan fried chicken comes together fast, making it a perfect last-minute dinner.
- Simple ingredients, bold flavor, just a handful of pantry staples plus fresh lemon and arugula create a restaurant-quality Italian chicken recipe at home.
Key Ingredients for Authentic Chicken Milanese
- Panko bread crumbs, These light, flaky Japanese breadcrumbs create a much crispier crust than regular breadcrumbs. Look for them in the Asian foods aisle or baking section. Do not substitute with fine breadcrumbs unless you want a denser coating.
- Parmesan cheese, Freshly grating a block of Parmesan (not the pre-shredded kind) gives you better melting and more nutty flavor. Use a microplane for the finest texture that blends easily with the panko.
- Boneless skinless chicken breasts, Buy large breasts (about 1½ pounds total) so you can butterfly and pound them into four even cutlets. Even thickness ensures they cook in the same time.
Kitchen Tools for Chicken Milanese
- Cast iron skillet, Its heat retention gives you consistent frying temperature and a beautiful golden crust. A heavy-bottomed stainless steel pan also works.
- Meat mallet or rolling pin, For pounding the chicken to an even 1/4-inch thickness. Cover with plastic wrap to avoid splatters.
- Three shallow bowls or baking dishes, For the flour mixture, beaten eggs, and panko-Parmesan coating. Use wide dishes so you can easily dredge each piece.
Tips for Making the Best Chicken Milanese
Pounding the chicken to an even 1/4-inch thickness is key, it helps the meat cook quickly and prevents the breading from burning before the inside is done. Use a meat mallet or rolling pin, placing the chicken between plastic wrap to keep things tidy. When dredging, shake off excess flour so the egg wash sticks without getting gummy. For the crispiest crust, press the panko mixture firmly onto each piece, making sure every spot is covered.
Fry in a cast iron skillet over medium-high heat, adding only 1 or 2 pieces at a time so the oil stays hot. If the pan gets crowded, the temperature drops and the coating turns greasy rather than crunchy. Let the cooked chicken rest on paper towels to absorb any extra oil before serving.
Pro-Level Techniques for Crispier Chicken Milanese
For an even crunchier crust, try letting the breaded chicken rest on a wire rack for 10 minutes before frying. This helps the coating adhere better and reduces the chance of it slipping off in the pan. Another trick: substitute half the panko with finely crushed cornflakes or add a pinch of cayenne to the flour for a subtle kick. When reheating leftover Chicken Milanese, skip the microwave and use a 400°F oven or air fryer to restore the crispness.
Chicken Milanese Variations to Try
If you don’t have arugula, serve the chicken over a simple dressed mixed greens or baby spinach salad with lemon vinaigrette. For a dairy-free version, skip the Parmesan and use nutritional yeast in the breading instead. You can also swap the chicken for thinly pounded pork cutlets or veal cutlets, just adjust cooking time as needed since they may cook slightly faster. Want more heat? Add a teaspoon of red pepper flakes to the panko mixture or drizzle the finished dish with hot honey for a sweet-spicy twist.
What to Serve with Chicken Milanese
Classic Chicken Milanese is served with a simple arugula salad, toss baby arugula with a lemon-olive oil dressing and shaved Parmesan. The peppery greens and bright citrus cut through the richness of the fried chicken. For heartier sides, try roasted broccoli, green beans almondine, or smashed potatoes. A side of bruschetta or a Caesar salad also pairs beautifully with this Italian chicken recipe.
How to Store Leftover Chicken Milanese
Store leftover Chicken Milanese in an airtight container in the refrigerator for up to 4 days. The breading will soften over time, so it’s best to reheat using the oven or air fryer method to bring back some crunch. If you plan to meal prep, consider storing the breaded raw cutlets (unfried) in the freezer instead for better texture later.
How to Freeze Unbreaded Chicken Cutlets for Later
While cooked Chicken Milanese is best eaten fresh, you can freeze the uncooked breaded cutlets for a quick meal later. After breading, place them on a parchment-lined baking sheet and freeze until solid, about 1 hour. Transfer the frozen cutlets to a zip-top bag and store for up to 3 months. To cook, fry directly from frozen, just add 1-2 minutes per side and check that the internal temperature reaches 165°F. Note that the coating may be slightly less crispy than freshly made.
Best Ways to Reheat Leftover Chicken Milanese
To bring back that crispy coating, reheat leftover Chicken Milanese in a 400°F oven for 7-10 minutes, placing the chicken on a wire rack set over a baking sheet so hot air circulates. An air fryer works even faster, 3-4 minutes at 375°F should do it. Avoid the microwave, as it will make the breading soggy. If you’re short on time, you can also reheat in a skillet over medium heat with a small drizzle of oil, flipping once, until warmed through and crisp.
Chicken Milanese FAQs
Why did my breading fall off during frying?
The breading may fall off if the chicken isn’t patted dry before dredging, or if you skip the flour step, flour helps the egg stick. Also, pressing the panko firmly onto the chicken and letting it rest for 5-10 minutes before frying can improve adhesion. Make sure the oil is hot enough (around 350°F) so the coating sets quickly.
Can I use chicken thighs instead of breasts?
Yes, boneless skinless chicken thighs work well, though they’re a bit thicker. Pound them to 1/4-inch thickness and adjust cooking time slightly, thighs may need an extra minute per side. They’ll stay juicy and flavorful, though the crust may not be as uniformly crisp due to the irregular shape.
How do I make this recipe gluten-free?
Replace the all-purpose flour with a gluten-free all-purpose blend, and use gluten-free panko breadcrumbs (many brands are available). Ensure the Parmesan cheese is truly gluten-free (most are, but check labels). The rest of the ingredients are naturally gluten-free.
Can I bake Chicken Milanese instead of frying?
Baking won’t give the same level of crunch as pan frying, but you can try. Place breaded chicken on a wire rack over a baking sheet, spray with oil, and bake at 425°F for 12-15 minutes, flipping halfway, until golden and cooked through. The coating will be less crispy but still tasty.
Recipe
Chicken Milanese

This Italian Chicken Milanese recipe is easy to make at home, you only need 30 minutes. Breaded chicken breasts are pan-fried until crispy and served with a simple arugula salad. The perfect dinner for any night!
Ingredients
- 2 boneless skinless chicken breasts
- kosher salt and black pepper, for seasoning
- 0.5 cup all-purpose flour
- 1 tsp garlic powder
- 3 large eggs
- 1 cup panko bread crumbs
- 0.75 cup freshly grated Parmesan cheese
- 1 tbsp parsley, finely chopped
- 1 tsp lemon zest
- 0.5 cup olive oil, for frying
- arugula salad, for serving
- lemon wedges, for serving
Instructions
- 1
Place the chicken breasts on a cutting board. Use a sharp knife to slice the chicken breast halves horizontally, butterflying them open. Cut each breast in half, to create 4 equal size pieces. Cover the chicken with plastic wrap. Use a mallet or rolling pin to pound the chicken out until it is about 1/4-inch thick. Remove the plastic wrap and season with salt and pepper.
- 2
In a medium shallow bowl or baking dish, combine the flour, garlic powder, 1/2 teaspoon salt, and 1/4 teaspoon black pepper. Set aside.
- 3
In a separate medium bowl or baking dish, whisk the eggs and set aside.
- 4
In a third medium shallow bowl or baking dish, combine the panko, Parmesan cheese, parsley, and lemon zest.
- 5
Dredge the chicken breasts in the flour mixture, coating both sides, shaking off excess. Next, dip the chicken into the eggs, letting any excess drain off. Add the chicken to the panko mixture and press until both sides are well coated. Repeat until all pieces are all breaded.
- 6
In a large cast iron skillet, heat the oil over medium high heat. Once the oil is hot, carefully place 1 or 2 pieces of chicken into the pan and cook for 2 to 3 minutes, on each side, or until chicken is cooked through.
- 7
Remove the chicken to a paper towel lined plate and repeat the process with the remaining chicken. Add more oil, if necessary.
- 8
Transfer chicken to a plates and serve with arugula salad and lemon wedges for squeezing.
Nutrition (per serving)
Calorie breakdown
How this was calculated — 12 of 12 ingredients matched
Nutrition information is automatically calculated from USDA FoodData Central, so should only be used as an approximation. Actual values may vary depending on the ingredients, brands, and preparation methods used.
Open in analyzerKeyword: breaded, Chicken, dinner, italian, pan-fried, Skillet
This post may contain affiliate links. Read our disclosure policy.
Share this recipe
You Might Also Like
View All →


About the Author
NutriforksNutriForks is a home-cooking site built around two simple ideas: recipes should actually work, and you should know what’s in them. Every recipe pairs clear, tested instructions with a full nutrition breakdown, so healthy, everyday cooking is genuinely easy.